Steam Workshop Upload Tool
- Keith Balding (Deactivated)
- Zane (Deactivated)
- Ian Kaleta
- Jared Creasy
Steps to get a map on Workshop and surprise your friends!
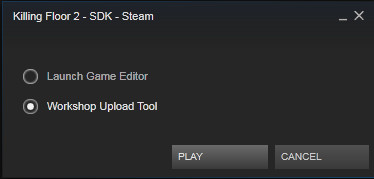
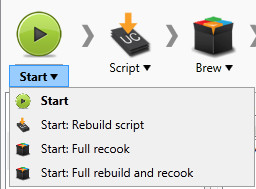
Step 1: Open the Killing Floor 2 SDK in the Steam client
Step 2: Choose the Workshop Upload Tool
Step 3: To create a new upload profile click the New Workshop Item. (If you want to upload over the top of an item you uploaded previously, use 'Existing Workshop Item')
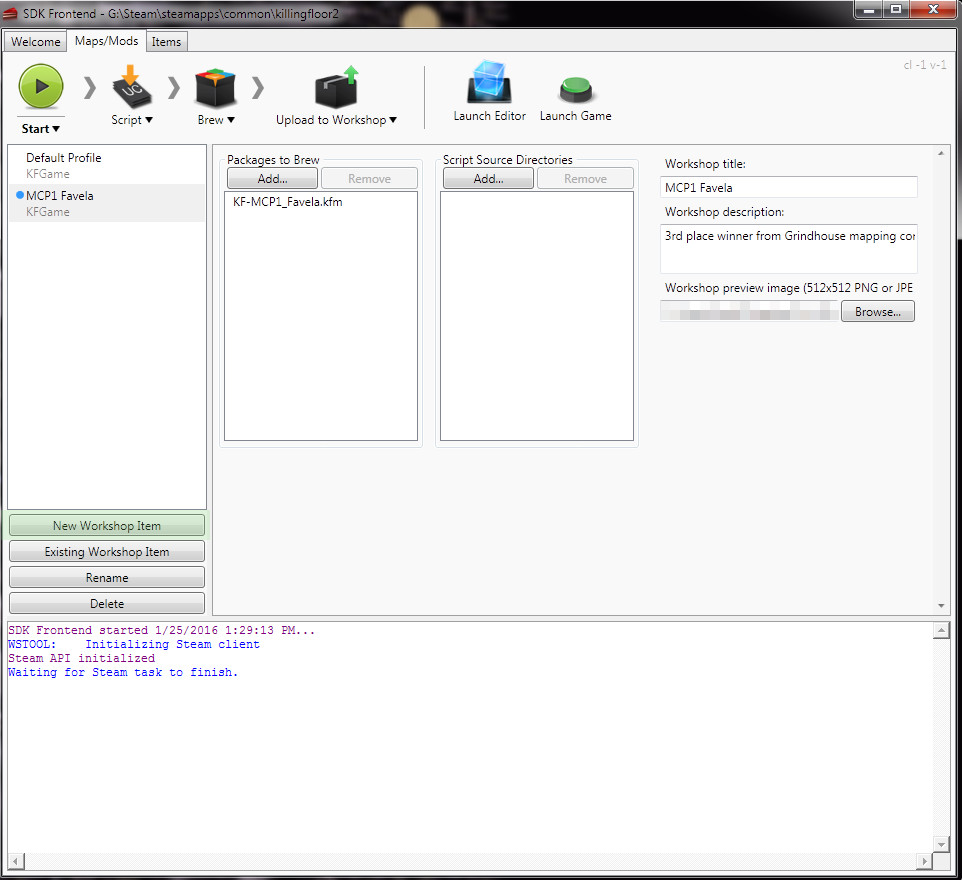
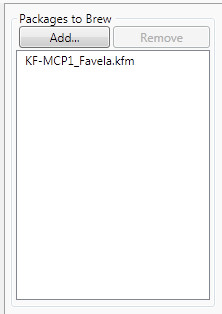
4) Under 'Packages to Brew' select 'Add...' and it will bring up a list of Maps that are located your \Documents\My Games\KillingFloor2\KFGame\Unpublished\BrewedPC\Maps folder. If you are only Compiling a mod, you can skip this step.
5) If your mod requires scripts, go Under 'Script Source Directories' select 'Add...' and it will bring up a list of Maps that are located in you local /Development/Src folder. If you are only Cooking a map, you can skip this step.

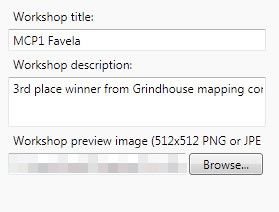
6) Give your Item a Workshop title, a description, and a preview image. The title and description can be changed on the Workshop page; you need to reupload to change the preview image, though.
7) Click the start button in the top left and wait for your map/mod to be cooked/compiled, then uploaded to the workshop.
8) Open Steam and browse to the Killing Floor 2 Workshop. If you click "Your Workshop Files" you should see your nice shiny new map/mod package.
DONE!
Alternatives Upload Methods
While there is a GUI tool to build scripts, brew data, and upload mods and maps to the Killing Floor 2 Steam workshop, the command-line tool that it invokes to upload to workshop can be invoked directly. This makes it possible to automate updating with a batch file or other script.
This guide applies to the Community Workshop for maps and mods, not the Curated Workshop where art assets and other items can be uploaded for consideration for inclusion in the game.
The newest version of the Steam Workshop uses directory trees as items, not single files. Workshop items do not need to be zipped or archived into single files any more, but they do need to be arranged correctly in a directory tree.
The name of the command line uploader is WorkshopUserTool.exe. It takes a single parameter: the name of a configuration file that is used to define the upload. It is installed as part of the Killing Floor 2 - SDK tool in Steam to the ...\SteamApps\common\killingfloor2\Binaries directory (the game and editor executables are in Win64 subdirectory of that path). It uses the base Killing Floor 2 user directory as its working directory (something like "C:\Users\<username>\Documents\My Games\KillingFloor2", depending on your version of windows). Wherever WorkshopUserTool.exe is on disk, it will only look in that directory for the configuration file it uses to define the upload. Here is an example of its format:
$Description "Another test of workshop."
$Title "Workshop Test"
$PreviewFile "C:\Users\NameHere\Pictures\WorkshopTest.png"
$Tags ""
$MicroTxItem "false"
$PackageDirectory "C:\Users\NameHere\Documents\My Games\KillingFloor2\TestMapUpload"
Those lines must be in that exact order in the file. The quotes are also necessary. The Description and Title lines are the title and description the item will be listed under on Steam Workshop. The PreviewFile is the picture that will be displayed for the item. The full path to the file must be given. The Tags line is a space-separated list of tags to associate with the item in the Workshop. MicroTxItem needs to be "false" to indicate this is not for the curated workshop. The PackageDirectory setting is the directory to be uploaded as the Workshop item. It's best to keep this as a subdirectory of ...My Games\KillingFloor2, since that's where the files will be coming from.
The contents of PackageDirectory will be installed to the user's KillingFloor2\KFGame\Published directory, and the content directory under it is BrewedPC, so usually the PackageDirectory will contain the directory BrewedPC with other directories like Maps, Packages, etc. Note that a limitation of Unreal Engine 3 is that all packages and maps must have distinct names even if they are in separate directories, so keep that in mind.
An example directory tree that was used to upload the Workshop Test map was:
TestMapUpload
- BrewedPC
- KF-WorkshopTest.kfm
- Packages
- ENV_WorkshopTest
- ENV_WorkshopTest_MAT.upk
- ENV_WorkshopTest_TEX.upk
- Config
- .ini
- Localization
- .int
- ENV_WorkshopTest
The workshop uploader tool is run with the name of the configuration file on the command line. The configuration file above was named wsinfo_testmap.txt, so the workshop test map was uploaded by running:
WorshopUserTool wsinfo_testmap.txt
As a heads up you can use the Tags field by doing any of the following:
$Tags "Maps,Mutators,Gamemodes,Weapons"
That would include all the current tags for Maps and Mods. Separate the tags by a single space.