KF2 Versus Survival Implementation
- Matt Lefevere (Deactivated)
- Jonathan Betancourt
Step-by-step guide
Killing Floor 2 – “Versus Survival” Implementation
This tutorial assumes you have a fully functioning Survival map for KF2, and now you would like to implement support for Versus Survival mode into your map. Fortunately the process is pretty straightforward, but there are some important steps to take which will be outlined below.
World Info settings
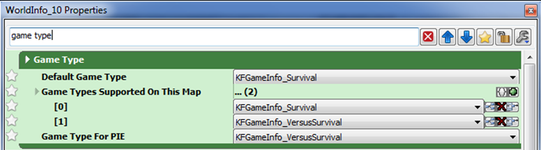
First you will need to set up your map to support the Versus Survival game type. Open the WorldInfo (View > World Properties) in your map and search for “game type”.
Default Game Type – This should be set to KFGameInfo_Survival.
Game Types Supported On This Map – You'll need two entries here: KFGameInfo_Survival and KFGameInfo_VersusSurvival. This will allow the map to be played in both modes.
Game Type For PIE – This should be set to KFGameInfo_VersusSurvival if you want to be able to test your map as a Zed in the editor (more on this later).
KFSpawnVolume settings
By default, all spawn volumes will allow player-controlled zeds to spawn inside them. If you have spawn volumes that you do NOT want player-controlled zeds to spawn in, then you need to open the properties of that volume and set bNoPlayers=true.
![]()
We use this setting when we do not want player-controlled zeds to see certain areas of the map, or if the collision makes it difficult for a player-controlled zed to navigate into the play space.
Your spawn volumes should also take into consideration which zeds you want to spawn in that part of the map. So if you don't want husks and sirens to spawn on rooftops, then you need to set the volume on the rooftop to use the Small squad size.
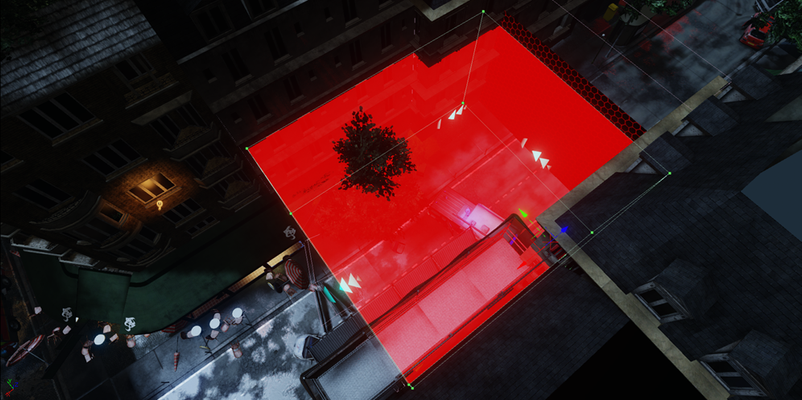
KFVersusNoGoVolume
For the spawn volumes in the background facade where you DO want player-controlled zeds to spawn, you will need to add a KFVersusNoGoVolume to encompass that spawn area. This volume has several purposes:
It allows you to place thick fog within the volume to prevent player-controlled zeds from seeing long distances, where assets may be popping in and out and allowing the player to see into the void.
It allows you to plug in a mesh that you want to be visible when standing inside the volume, but hidden when standing outside the volume (e.g. NoGo Walls and arrows, explained below).
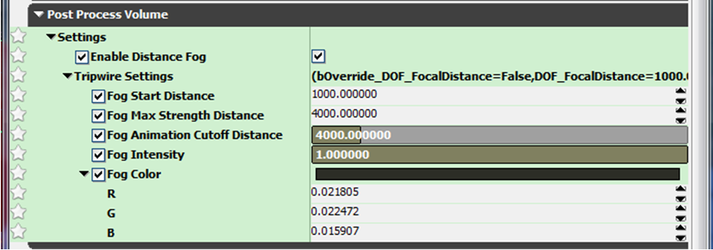
Once you've placed the KFVersusNoGoVolume around the background area, you need to modify a few settings if you want to restrict the players view inside the volume. Expand the Post Process volume rollout and modify these settings as follows:
Now, you may want to add what we call “NoGo Walls”. These are large opaque walls that prevent the player-controlled zeds in the background facade from seeing areas of the map without any art in them.

You can create this wall with any number of meshes, but we typically use single walls such as:
StaticMesh'Env_Modular_StaticSet_MESH.single_mesh.Wall.Base.Single_Wall'
These meshes can be arranged to create a wall based on each situation.

Once you've placed the meshes, add the following material to them:
Material'Env_Mat_Lib_Two.Basic.Zed_Blocking_Grid_PM'
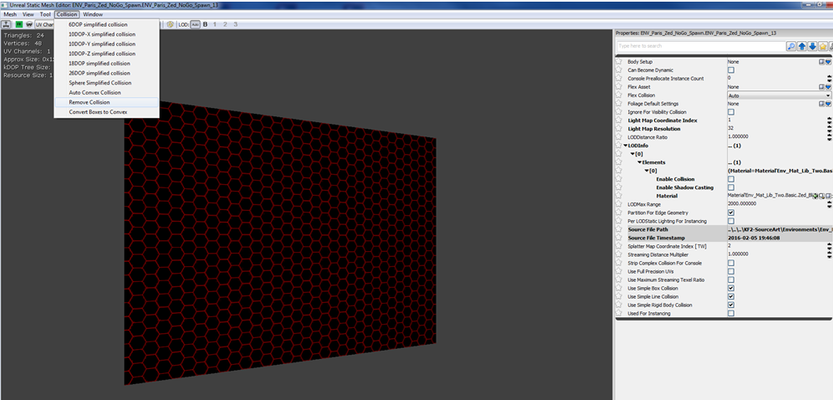
Note: Save your map at this point, because the editor can sometimes crash when doing the next step.
Next, select all of the meshes that make up your NoGo Wall, right-click and select “Combine Static Meshes [TW]”.
Create a new package and give your mesh a name.
Select “yes” when asked to combine convex collisions.
Select “yes” when asked to replace actors in scene. Your combined mesh will now be placed in the map.
Save the map and your package.
Next, you may want to add arrows to guide player-controlled zeds out of the spawn area into the play space. This is a similar process to creating a NoGo Wall.
Select a modular mesh such as the following:
StaticMesh'Env_Modular_StaticSet_MESH.single_mesh.Wall.Half.Base.Single_Wall_HalfXpos'
Next, apply the following material to the mesh:
Material'Env_Mat_Lib_Two.Basic.Zed_Blocking_Arrow_PM'
Rotate the mesh so that your arrows are pointing in the right direction towards the play space.
Now, select all of your arrow meshes and combine them using the same steps above. Save the combined mesh in your package.

Next, you need to turn off the collision on your combined meshes so they won't cast shadows or be considered for precomputed visibility. In the package you created, double-click each static mesh to open its properties, then go to Collision → Remove Collision. Save the package.
Note: Since your NoGo Walls will not have collision, you need to add a BlockingVolume around them to prevent the player-controlled zeds from running through the wall and getting outside of the map.
Next, open the properties of your NoGo Wall in the map and expand the Display rollout. Set the bHidden flag to true. This will hide the mesh by default (we will toggle its visibility in the next step).

Now that you've created your NoGo Walls and arrows, you need to assign them to the KFVersusNoGoVolume that you created earlier. Open the properties of the volume and expand the KFVersus No Go Volume rollout. Add an item to the array for each of your combined meshes (in this case, the NoGo Wall mesh and the arrow mesh are each added to the array).
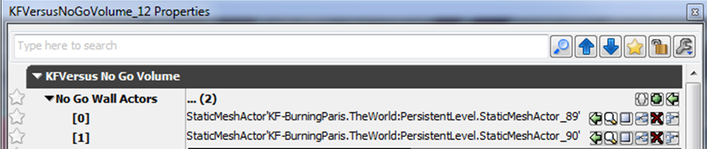
The KFVersusNoGoVolume is essentially a combination of a Trigger Volume and a Post Process Volume. It will unhide your combined meshes when the volume is touched by a player-controlled zed, and it will hide the combined mesh when the volume is untouched. This eliminates the need for any Kismet scripting.
The volume is already set up in code to ensure that only characters who touch the volume will see the meshes. So it is important that you keep the volume outside of the play space so that human survivors can never touch it, only player-controlled zeds.
KFPawnBlockingVolume settings
In Versus Survival mode, the player-controlled zeds are able to access parts of the map that human survivors and AI-controlled zeds cannot. For example, the slasher can jump on top of tall obstacles such as trucks. If you previously had a Blocking Volume around an object like this, then you need to right-click the volume and select Convert → Convert To Volume → KFPawnBlockingVolume.
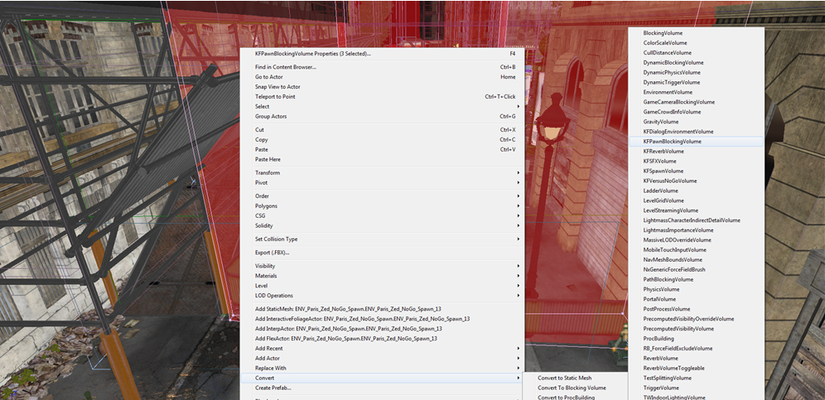
The KFPawnBlockingVolume will allow the player-controlled zeds to go through it, but can prevent human survivors and AI-controlled zeds from going through it. To change these settings, open the volume properties and expand the KFPawn Blocking Volume rollout. Here you can set what this volume will block (in the example below, the volume blocks human survivors and AI, but does NOT block player-controlled zeds.

You may want to use these volumes in areas where the zed can take shortcuts through the non-playable space.
Next, open the properties of your KFPawnBlockingVolume and set bBlockRigidBody=false. This will prevent physics glitches when the zeds walk through these volumes. You should also set bFlexAsset=false to prevent Flex gore from colliding with the volume.
Tip: Press Shift+V three times to view Rigid Body mode. In this view mode, only volumes with bBlockRigidBody=true will be rendered (the pink volumes). KFPawnBlockingVolumes with bBlockRigidBody=false will not be rendered. This is helpful because it lets you see what only player-controlled zeds will collide with. So if you don't see a pink volume, then you know the player-controlled zeds can walk through that area.
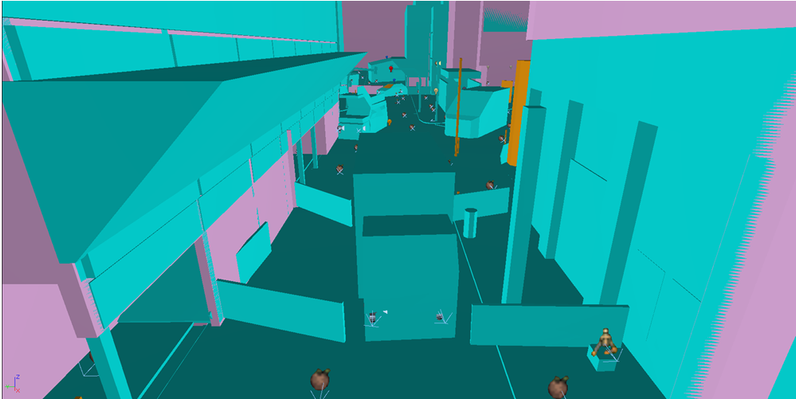
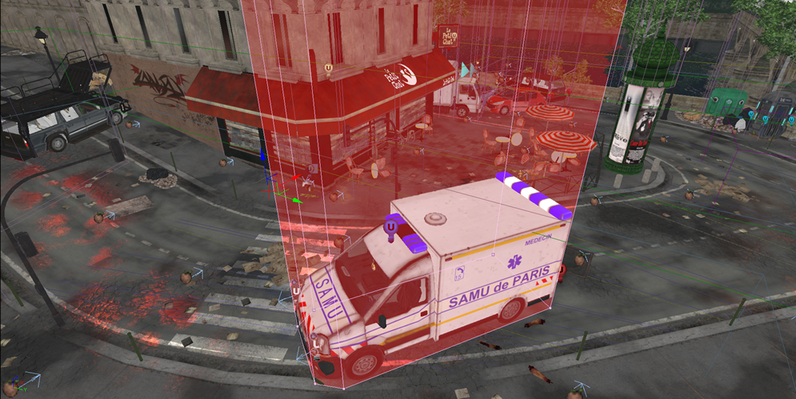
In some cases, you will want to allow player-controlled zeds to get on top of a vehicle or other tall obstacle, but also block human survivors and AI-controlled zeds from getting on top of it. The following screenshot is an example of a KFPawnBlockingVolume that does this.
Playtesting
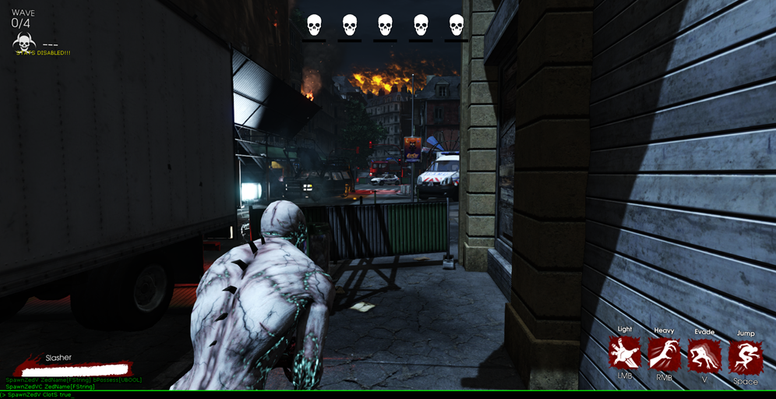
Eventually you'll want to playtest the map in the editor as a Zed. To do this, select Play In Editor or Play In Viewport. You will spawn as a human survivor. Type the following command to become a Zed:
SpawnZedV [ZedName] true
SpawnZedV spawns a Versus Survival zed. [ZedName] is the name of the Zed you want, such as Bloat, Fleshpound, or ClotS (Slasher), and “true” is the value for the parameter bPossess which allows you to possess the Zed.
The following is a list of Zed names which can be inserted into the [ZedName] parameter:
ClotA (Alpha Clot)
ClotS (Slasher)
Crawler
Bloat
Gorefast (or GF)
Husk
Siren
Scrake (or SC)
Fleshpound (or FP)
This will allow you to test as different zeds to look for collision, pathing, or gameplay issues.