KF2 How-to make a custom weapon
- Zane (Deactivated)
- Mia Quattrochi
This tutorial will go over how to create a custom weapon and add it to the trader for use in your custom game mode. In this case, we are going to make the Swat MP7 an incendiary weapon that cross perks with the fire bug.
The steps involved:
- Create the damage type
- Create weapon definition
- Create UI icon
- Create the weapons class
- Import into trader
- Create mode to use trader
- Test the mod
Create the Damage Type
The damage type is what contains the damage values as well as the effect in which they apply. In the case of the incendiary ammo, we are going to applying stumble and a fire dot. We are going to piggy back off the DoT that the Trench gun uses for this turorial. This can be seen in the property, BurnDamageType. We assign this value to KFDT_Fire_DragonsBreathDoT. However, if one so chooses to, that class can be extended to modify the damage there. The burn power is how much damage is going to be applied per interval on the damage over time.
class KFWeap_SMG_IncendiaryMP7 extends KFWeap_SMG_MP7;

DefaultProperties
{
	InventorySize=4

	WeaponSelectTexture=Texture2D'ExampleWeapons.IncendiaryMP7_UI_Tex'

	MagazineCapacity[0]=30
	SpareAmmoCapacity[0]=330
	InitialSpareMags[0]=6

	// DEFAULT_FIREMODE
	FireModeIconPaths(DEFAULT_FIREMODE)=Texture2D'ui_firemodes_tex.UI_FireModeSelect_BulletAuto'
	FiringStatesArray(DEFAULT_FIREMODE)=WeaponFiring
	WeaponFireTypes(DEFAULT_FIREMODE)=EWFT_InstantHit
	WeaponProjectiles(DEFAULT_FIREMODE)=class'KFProj_Bullet_AssaultRifle'
	InstantHitDamageTypes(DEFAULT_FIREMODE)=class'KFDT_Fire_MP7'
	FireInterval(DEFAULT_FIREMODE)=+.063 // 950 RPM
	Spread(DEFAULT_FIREMODE)=0.015
	InstantHitDamage(DEFAULT_FIREMODE)=16 //20
	FireOffset=(X=30,Y=4.5,Z=-5)

	// ALT_FIREMODE
	FireModeIconPaths(ALTFIRE_FIREMODE)=Texture2D'ui_firemodes_tex.UI_FireModeSelect_BulletSingle'
	FiringStatesArray(ALTFIRE_FIREMODE)=WeaponSingleFiring
	WeaponFireTypes(ALTFIRE_FIREMODE)=EWFT_InstantHit
	WeaponProjectiles(ALTFIRE_FIREMODE)=class'KFProj_Bullet_AssaultRifle'
	InstantHitDamageTypes(ALTFIRE_FIREMODE)=class'KFDT_Fire_MP7'
	FireInterval(ALTFIRE_FIREMODE)=+.063 // 950 RPM
	InstantHitDamage(ALTFIRE_FIREMODE)=16 //20
	Spread(ALTFIRE_FIREMODE)=0.01

	AssociatedPerkClasses(0)=class'KFPerk_Swat'
	AssociatedPerkClasses(1)=class'KFPerk_Firebug'
}
Create the Weapon Definition
The weapon definition is a lighter weight class that contains information to be loaded in the trader so that we do not have to load all the class animation, icons and other properties. Otherwise we would be out of memory in a heartbeat. In order to get a weapon into the trader this class must be made. However, this class can be skipped if we do not ever plan to purchase ammo for, sell or purchase this weapon via the trader menu.
In the weapons def we define:
- Which class to load
- WeaponClassPath
- The icon to use
- ImagePath
- The price to purchase the weapon
- BuyPrice
- The price for ammo
- AmmoPricePerMag
- SecondaryAmmoMagPrice
In addition, this class handles logic to get localization. These can be overridden to hard code weapon names.
KFWeaponDefinition::GetItemName()
KFWeaponDefinition::GetItemDescription()
//=============================================================================
// KFWeaponDefintion
//=============================================================================
// A lightweight container for basic weapon properties that can be safely
// accessed without a weapon actor (UI, remote clients).
//=============================================================================
// Killing Floor 2
// Copyright (C) 2016 Tripwire Interactive LLC
//=============================================================================
class KFWeapDef_IncendiaryMP7 extends KFWeaponDefinition
	abstract;

static function string GetItemName()
{
	return "Incendiary MP7";
}

static function string GetItemDescription()
{
	return "This is a fire version of the MP7 made in the tutorial";
}

DefaultProperties
{
	WeaponClassPath="ExampleMeleeWeapon.KFWeap_SMG_IncendiaryMP7"
	ImagePath="ExampleWeapons.IncendiaryMP7_UI_Tex"

	BuyPrice=800
	AmmoPricePerMag=26 //26


	EffectiveRange=70
}
Create UI Icon
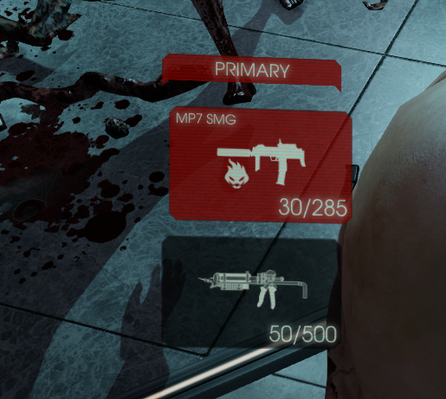
If we want to be able to tell the weapon apart from the base one, we are going to need an icon. If you do not want to make one, just use a program like Paint.net to turn the black into alpha on the example given here: Figure 4.1
Next we need to open the Editor to import our icon.
- Click Import in the Content Browser Figure 4.2
- Select your image and click open.
- Set the LODGroup to TEXTUREGROUP_UI Figure 4.2
- This will prevent the engine from streaming them in and reducing quality.
- Once imported, save the package and put it in C:\Users\<User>\Documents\My Games\KillingFloor2\KFGame\Unpublished\BrewedPC\Packages\<Insert folder name here>
- Generally, I find it easier to copy this package over to the published folder as well. C:\Users\<User>\Documents\My Games\KillingFloor2\KFGame\Published\BrewedPC\Packages\<Insert folder name here>
- Once the image is saved in the Editor, we want to right click it and select Copy Full Name To Clipboard.
- This will do exactly as the name implies. We will have the the full name of the image so that we can put it in the default properties of the weapon class and weapon definition class.
- In our case - Texture2D'ExampleWeapons.IncendiaryMP7_UI_Tex'
- Return to the weapon def and put define the string with the bold text of the image full name Texture2D'ExampleWeapons.IncendiaryMP7_UI_Tex'.
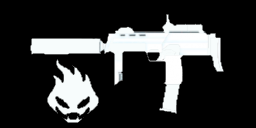
Figure 4.1
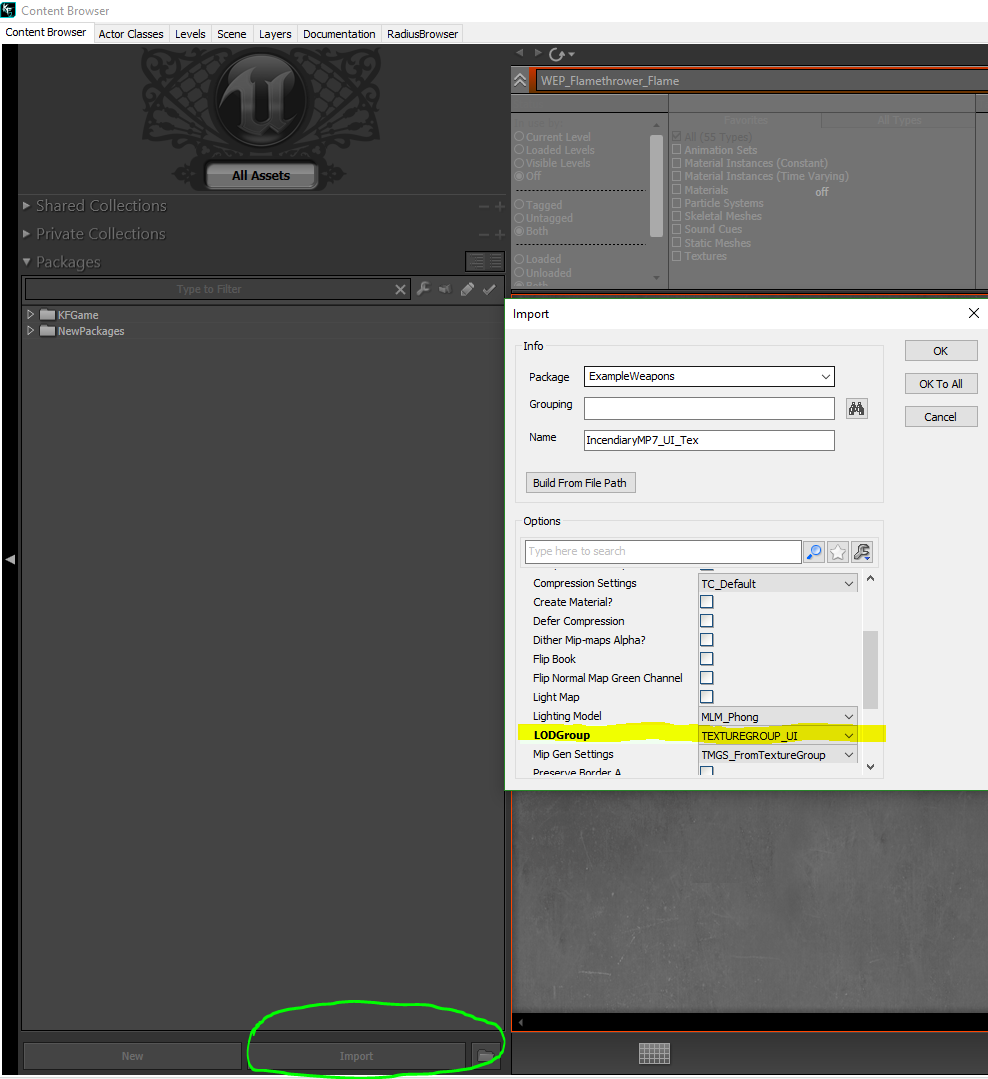
Figure 4.2
Create the Weapon Class
The weapon class is going to contain the logic for in which the weapon reloads, fires, animates and so on. It is loaded by the weapon definition when purchased and utilizes our damage type to dispatch zeds.
Since we are wanting to make the MP7 have incendiary ammo we do not have to change much on it. Lets start off by extending the KFWeap_SMG_MP7.
We want to assign the weapon select texture so that we can see it in the inventory when scrolling through it. Assign the image full name from the previous step into the WeaponSelectTexture in the DefaultProperties.
From there we want to define what the firemodes do. The MP7 has two fire modes; full auto (WeaponFiring) and semi auto (WeaponSingleFiring.) In the blocks defining these one will find the property InstandHitDamageType. We want to assign the previously create damage type here.
Be sure to return to the weapon definition.
class KFWeap_SMG_IncendiaryMP7 extends KFWeap_SMG_MP7;

DefaultProperties
{
	InventorySize=4

	WeaponSelectTexture=Texture2D'WEP_UI_MP7_TEX.UI_WeaponSelect_MP7'

	MagazineCapacity[0]=30
	SpareAmmoCapacity[0]=330
	InitialSpareMags[0]=6

	// DEFAULT_FIREMODE
	FireModeIconPaths(DEFAULT_FIREMODE)=Texture2D'ui_firemodes_tex.UI_FireModeSelect_BulletAuto'
	FiringStatesArray(DEFAULT_FIREMODE)=WeaponFiring
	WeaponFireTypes(DEFAULT_FIREMODE)=EWFT_InstantHit
	WeaponProjectiles(DEFAULT_FIREMODE)=class'KFProj_Bullet_AssaultRifle'
	InstantHitDamageTypes(DEFAULT_FIREMODE)=class'KFDT_Fire_MP7'
	FireInterval(DEFAULT_FIREMODE)=+.063 // 950 RPM
	Spread(DEFAULT_FIREMODE)=0.015
	InstantHitDamage(DEFAULT_FIREMODE)=16 //20
	FireOffset=(X=30,Y=4.5,Z=-5)

	// ALT_FIREMODE
	FireModeIconPaths(ALTFIRE_FIREMODE)=Texture2D'ui_firemodes_tex.UI_FireModeSelect_BulletSingle'
	FiringStatesArray(ALTFIRE_FIREMODE)=WeaponSingleFiring
	WeaponFireTypes(ALTFIRE_FIREMODE)=EWFT_InstantHit
	WeaponProjectiles(ALTFIRE_FIREMODE)=class'KFProj_Bullet_AssaultRifle'
	InstantHitDamageTypes(ALTFIRE_FIREMODE)=class'KFDT_Fire_MP7'
	FireInterval(ALTFIRE_FIREMODE)=+.063 // 950 RPM
	InstantHitDamage(ALTFIRE_FIREMODE)=16 //20
	Spread(ALTFIRE_FIREMODE)=0.01

	AssociatedPerkClasses(0)=class'KFPerk_Swat'
	AssociatedPerkClasses(1)=class'KFPerk_Firebug'
}
Import Weapon Into Trader
In order to use the weapon in the trader, the trader arch must know it exists. However, we do not want to modify the original since it would not allow you to connect to game. Instead, we are going to create our own.
- Create a sub archetype of the original arch type so that we do not have to. Figure 6.1
- Save your trader in your own package just like we did with the image we created.
- Open the archetype by double clicking on it.
- Add another entry into the array by clicking the green + icon. Figure 6.2
- Scroll to the bottom of the list and click the arrow to expand the last element properties.
- Click the weapon def down down and select the weapon def we create from earlier.
- Note: If we did not include our package in the KFEditor.ini, we will not see it here. Make sure this is done!
- Once the item is in the trader list, click the checkbox for Build Item Info. This will build the info on all weapons for the trader. Figure 6.3
- Save the trader and copy the full name to clipboard for use later.
- KFGFxObject_TraderItems'ExampleWeapons.ExampleWeaponTraderItems'
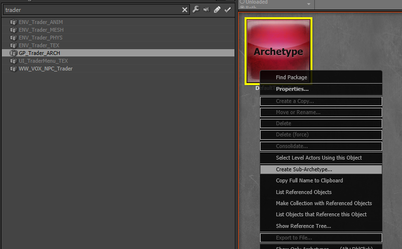
Figure 6.1

Figure 6.2

Figure 6.3
The reference to the custom trader is going to live in the game replication info. We want to create our own. Set the property TraderItems to our trader items archetype that was create in the previous step.
From there we need to assign this in our custom game mode. (Note: There is a tutorial for custom game modes here)
Assign the GameReplicationInfoClass to the one we created in the default properties.
class KFGameInfo_ExampleSurvival extends KFGameInfo_Survival;
DefaultProperties
{
	//defaults
	//PlayerControllerClass=class'ExampleMeleeWeapon.KFPlayerController_Example'
	PlayerReplicationInfoClass=class'ExampleMeleeWeapon.KFPlayerReplicationInfo_Example'
	GameReplicationInfoClass=class'ExampleMeleeWeapon.KFGameReplicationInfo_ExampleWeapons'
}
Test The New Trader and New Weapon
If you have not already, make sure you compile the script and brew the content. One may skip brewing to until later by launching with "-useunpublished"
To test the weapon, one could either enter the cheat GiveWeapon <Instert Package Name.Insert class name> or simply check the trader in game by launching their custom game mode.
- open KF-BioticsLab?game=<Insert Package Name>.KFGameInfo_ExampleSurvival